Columbus, Ohio Premodern
Playing the Most Magic at Buckeye Brawl II
I mean, I went to time thrice; that’s gotta be close. Playing my homebrewed deck of Treva Glaciers, a WUG Fog Control deck, I managed to secure a top 16 finish at BBII with a 5-2 record, going to time 3 times in a row during the event.
Doing better than I had hoped with the deck, I wanted to document both this event and the deck in general. Earning the moniker of the “Most Tempting Brew” at Buckeye Brawl II, this brew has been a personal achievement of mine and one I look forward to playing more of in the future.
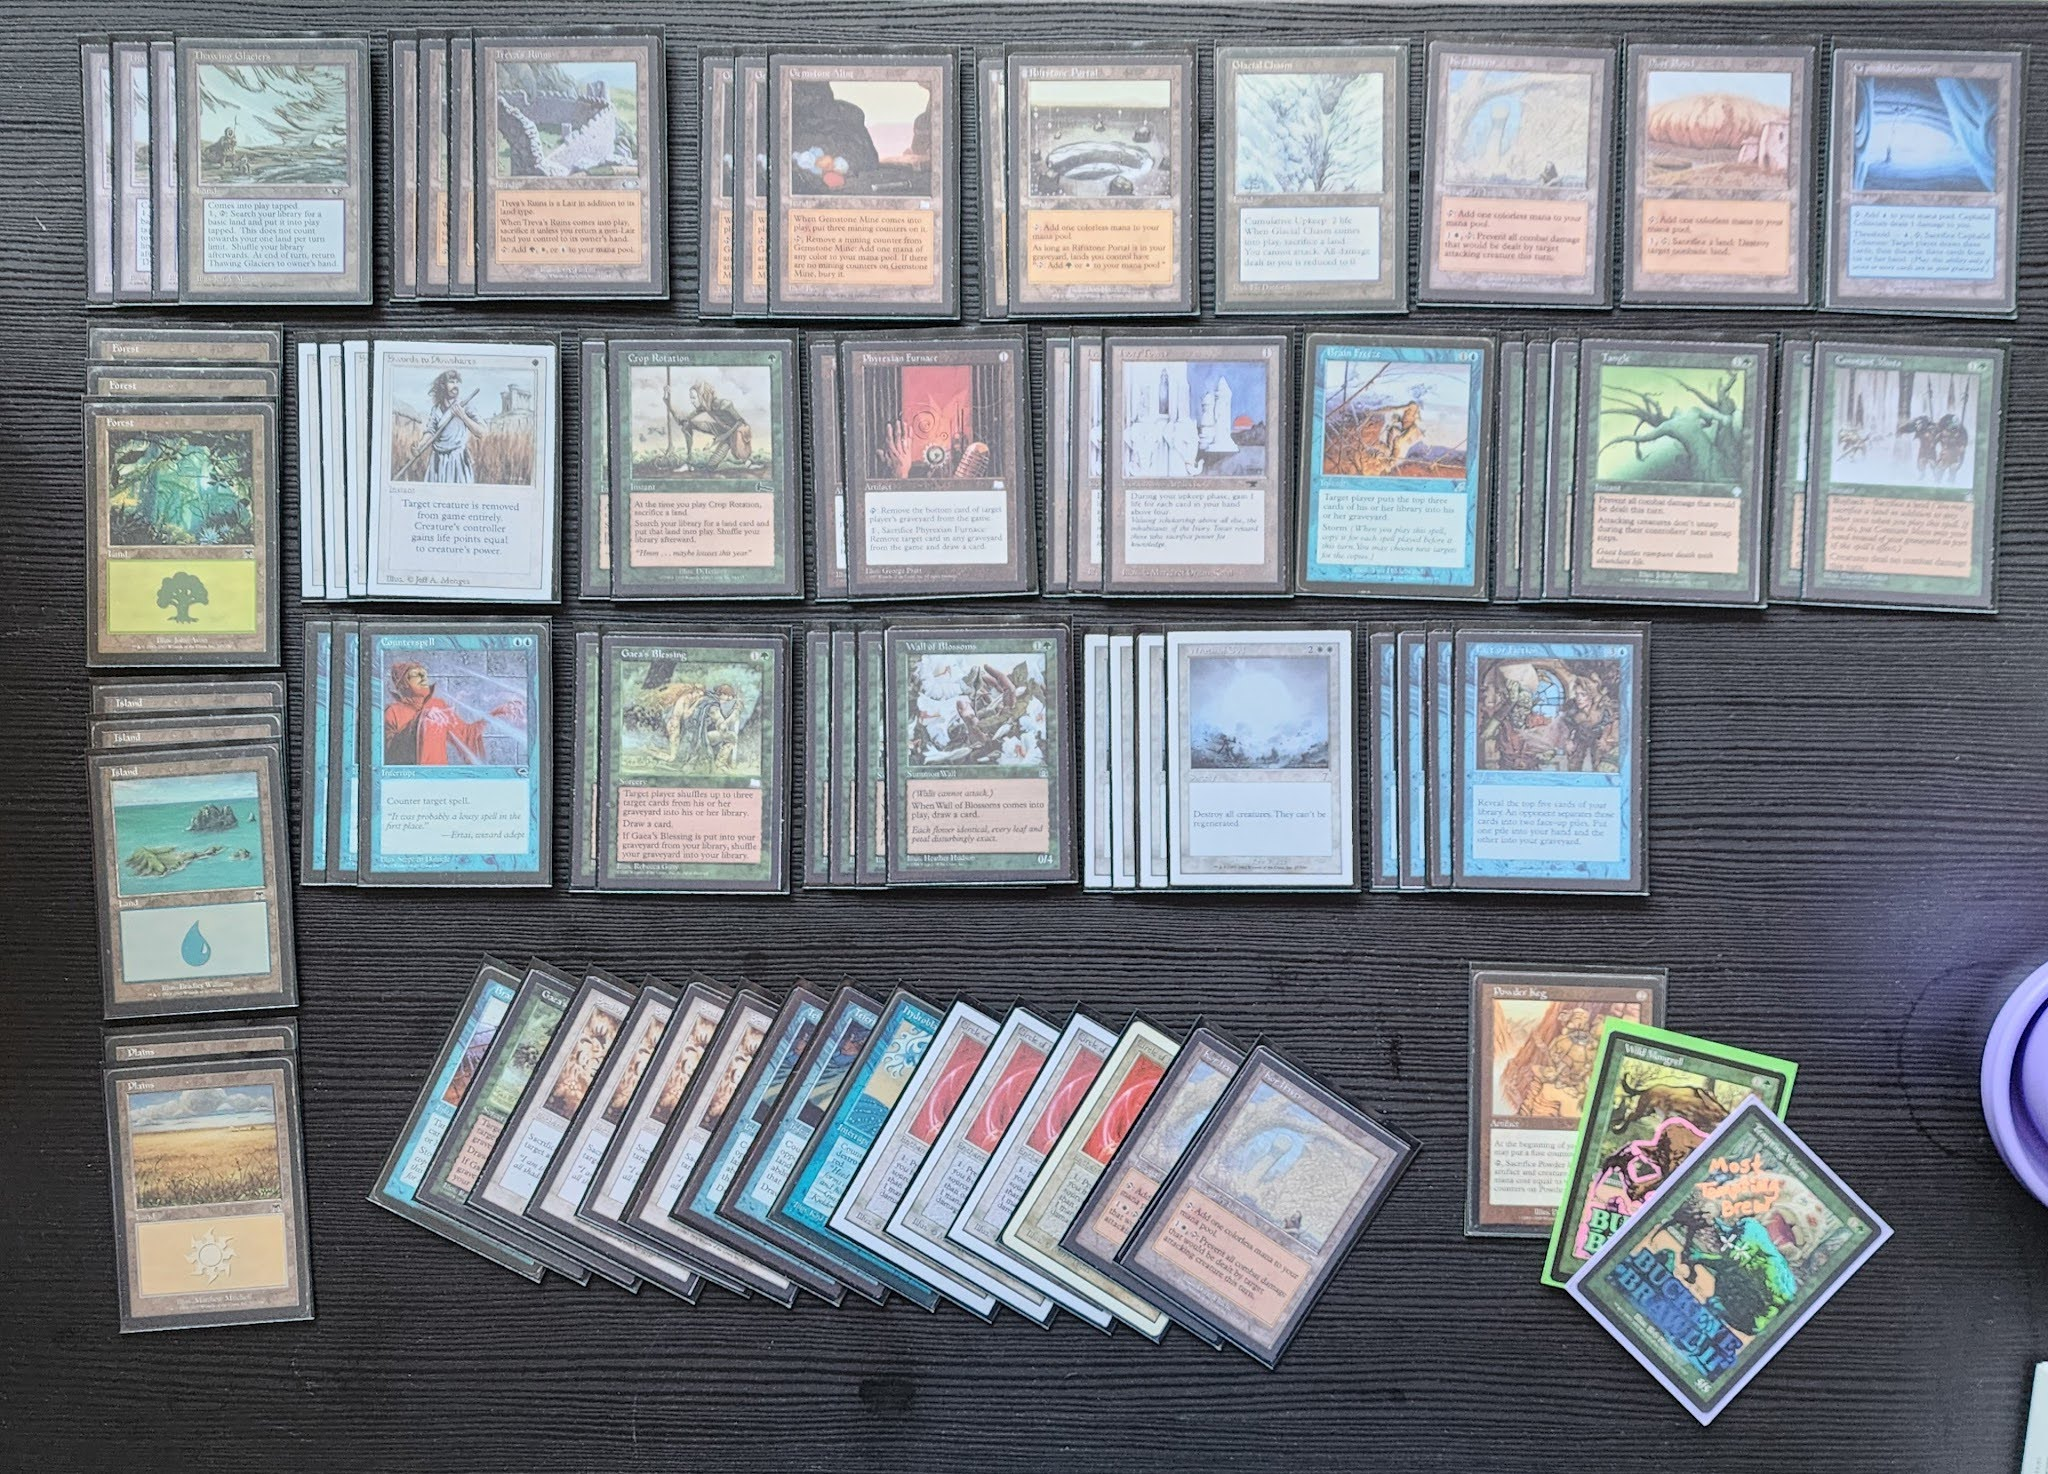
THE DECK
This list is an original of myself, Ryan Nichols. First brewed around five months ago, I debuted it at one of the Warp Gate monthlies with a less-than-stellar 1–3 finish and have continued to innovate on it since. Unfortunately, I was not able to attend the past few Retromancer monthlies for matchup practice. The deck as well, due to its extremely slow nature, does not lend well to pickup games between rounds at other events.
With the lack of significant practice on the deck, I was hesitant to even bring it to the Buckeye Brawl. I considered instead to fall back on my most played deck of Machine Head, which I played at the last Brawl and had a 4-3 finish with. In the end though, I decided to follow through with Treva Glaciers, and have absolutely no regrets doing so.
This deck is a control deck at its core, looking to create advantage over a long game and win through inevitability. Unlike most control decks, however, this inevitability does not come through a large late-game threat, a persistent, hard-to-interact-with attacker, or a combo. Instead, it simply lets the opponent draw themselves out of cards, with a little nudge along the way.
The primary win condition of the deck is its two copies of [[Gaea’s Blessing::Gaea’s Blessing]], which can shuffle each other back into my deck along with interactive spells to ensure I never deck myself. In time, it also makes my deck into nothing but interaction, looping every removal spell, counterspell, and boardwipe as much as I could want. The mainboard also contains one copy of [[Brain Freeze]], which is very useful in some matchups where I want to try and close the game sooner, while in others it simply serves to end a game a few turns faster in consideration of the clock.
Following is my path through Buckeye Brawl II, highlighting some key events throughout the day as well as some takeaways I had in various games.
# Mainboard

3 Ivory Tower @atq/53
2 Phyrexian Furnace @wth/155
4 Wall of Blossoms @sth/125
1 Brain Freeze @scg/29
2 Constant Mists @sth/104
3 Counterspell @tmp/57
2 Crop Rotation @ulg/98
4 Fact or Fiction @inv/57
4 Swords to Plowshares @3ed/41
4 Tangle @inv/213
1 Cephalid Coliseum @ody/317
1 Dust Bowl @mmq/316
1 Forest @ons/347
2 Forest @ons/347
3 Gemstone Mine @wth/164
1 Glacial Chasm @ice/353
3 Island @ons/336
1 Kor Haven @nem/141
2 Plains @ons/332
2 Riftstone Portal @jud/143
1 Thawing Glaciers @all/144
3 Thawing Glaciers @all/144
4 Treva's Ruins @pls/143
2 Gaea's Blessing @wth/129
4 Wrath of God @7ed/57

# Sideboard

1 Brain Freeze @scg/29
1 Circle of Protection: Red @2ed/13
3 Circle of Protection: Red @2ed/13
1 Gaea's Blessing @wth/129
1 Hydroblast @ice/72
2 Kor Haven @nem/141
4 Seal of Cleansing @nem/18
2 Teferi's Response @inv/78
ROUND 1: VS. GW OATH PONZA
I had a rough start to the day with some very unfortunate variance. Winning the die roll and taking the play, I mulled to 5, seeing three one-landers in a row. I kept the third one-lander to avoid dropping to 4. It got blown up on turn two, and I never drew a land over the following few turns before I conceded.
Game 2 wasn’t so egregious but still a loss. I struggled to keep the mana I needed and also realized a few turns in that I forgot to board in my [[Teferi’s Response::Teferi’s Responses]]. The game ended as my opponent’s unanswered [[Terravore]] killed me.
Record: 0–1 (0–2–0)
ROUND 2: VS. 4C DEVOURER OATH FLING
This match was against a deck I had never heard of before, and the brewer’s advantage came in hot for my opponent in Game 1. I kept a hand with 3 [[Tangle::Tangles]], which didn’t seem so useful when my opponent flung a 20/20 [[Phyrexian Devourer]] at my face.
After sideboarding, though, this matchup felt much more favored. Getting to cut all the fogs, walls, and some of the board wipes for more relevant interaction, namely [[Seal of Cleansing]] and [[Circle of Protection: Red]], let me lock down the matchup.
In Game 2, my opponent played an [[Oath of Druids]], not realizing quite the kind of deck I was. I didn’t play any creatures, as I had none to play post-sideboarding, and they eventually just cast a [[Phyrexian Dreadnought]] with the plan to try and just attack with it if they couldn’t get off their combo. I largely ignored the [[Oath of Druids::Oath]], although at one point around turn 7 I took the trigger to just mill my library and shuffle my graveyard back in via the [[Gaea’s Blessing::Gaea’s Blessing]] Trigger since my graveyard had 3 [[Fact or Fiction::Fact or Fictions]] and 2 [[Swords to Plowshares]] that I wanted in my deck, not my yard. I won the game by just keeping [[Phyrexian Devourer::devourer]] off the board and taking advantage of my opponent’s deck being rather slow.
Game 3 was similar to Game 2. The main thing I remember is casting a [[Crop Rotation]] in response to a [[Fling]] to find a [[Glacial Chasm]], negating that attempted combo kill.
Record: 1–1 (2–3–0)
ROUND 3: VS. R GOBLINS
As is often the case with control into aggro, sometimes they just go under you. That happened here in Game 1. I don’t remember the specifics, but looking at my lifepad, I see that I went 20>19>15>6>0, so whatever happened, it was quick. There was probably a [[Goblin Lackey]] involved.
Games 2 and 3 taught me an important lesson in sideboarding, which is to keep in my [[Brain Freeze]] if I lost the first game, even if it is theoretically correct for the matchup to take it out. Against many aggressive decks I generally board out [[Brain Freeze]] as I don’t need it to win and it feels largely like a dead card. However, in Game 2 I realized that since I lost Game 1, the usual strategy I employ of just letting the game run forever was actually in my opponent’s favor. I did eventually realize I could loop [[Cephalid Coliseum]] to speed up my clock, which prompted my opponent to scoop so we’d have some time for Game 3.
Of course I didn’t process this lesson until after Game 3, so I still was without [[Brain Freeze]] going into the last game. I got the game to the point of my usual lock: high life total, lots of lands, and a full grip, but we ran out of time before my opponent drew out. Here I want to give an extra big thank you to my opponent of this round, Guy Scott, for graciously conceding this Game 3 to me when by all rights it should have been a 1–1–1 draw.
Record: 2–1 (4–4–0)
ROUND 4: VS. RG SLIGH
This round is an example of what I want to do against aggressive decks and why the [[Brain Freeze]] isn’t necessary outside of needing to mind the clock. To make a 45-minute-long story short, my Game 1 ended with my opponent drawing out while I was sitting at 137 life.
Game 2 started in turns and was simply a draw, as my opponent could not find a kill in the few turns they had.
Record: 3–1 (5–4–1)
ROUND 5 VS. GW OATH PONZA:
This round features an even longer story, as it was only a single game total. My opponent tried to slow me down and push through with various mana denial, blowing up my lands and by the end of the game having 3 [[Sphere of Resistance::Spheres of Resistance]] in play. However, it wasn’t enough and they drew out with me finally having a chance to resolve a [[Brain Freeze]] in turn 1 after time was called.
Record: 4–1 (6–4–1)
ROUND 6: VS. MONEYBALL BLACK
This matchup was one I was worried about going into the Brawl, as their hand disruption can make any hand fall apart, and [[Wasteland]] can bring a hand relying on a [[Thawing Glaciers]] to its knees. Luckily I was able to keep that from happening here. I don’t remember much in terms of specifics, but the [[Wall of Blossoms]] were on blocking duty for the [[Ravenous Rats]] and [[Mishra’s Factory::Mishra’s Factories]], letting me dedicate [[Kor Haven]] activations and pointed removal/countermagic for [[Hypnotic Specter]] and [[Skittering Skirge]]. My opponent conceded about 30 minutes into game 1, admitting they weren’t exactly sure what my wincon would look like but not wanting to take all the time to find out.
Game 2 showcased the peril of [[Phyrexian Arena]] into control. My opponent had an early [[Phyrexian Arena::arena]], and a few turns later dropped a second one. This notably changed the dynamic of the game. I didn’t need to last nearly as many turns, but my opponent would also be churning out threats that I needed to answer at a faster pace. By the time my opponent untapped for their last turn, dropping to 1 life from their triggers, I was at 11. Not worryingly low, but lower than I would usually like to be considering it was a 10+ turn game. Hilariously, the game still ended in a draw, though this time to a [[Crypt Rats]] my opponent played and exploded for 11 to take us both out together. At least this draw wasn’t my fault!
Record: 5-1 (7–4–2)
ROUND 7: VS. UW LANDSTILL
This is where I really wish I had done some testing before the Brawl. I was worried about this matchup going in, but after playing it was much worse than I thought. I wish I had played it before so I would know just how bad it was and been able to make some sideboard adjustments for it.
In particular, my deck does not have a very clean answer to an end step cycle [[Decree of Justice]] backed up by untapping into much more countermagic than I have. Against BW control, I can consistently fog the attack then boardwipe, but not when my opponent can hold up [[Counterspell]], [[Mana Leak]], and [[Prohibit]].
Games 1 and 2 went about the same. We played lands at each other for a while, he cycled some number of [[Decree of Justice::decrees]] and eventually I couldn’t answer them.
Record: 5-2 (7–6–2)
SOME MORE CARDS
Beyond the deck overview above, I wanted to go into some specific choices I made in the deck. What cards matter, how I use them, and some notable exclusions.
[[Thawing Glaciers]] is the titular glacier of the deck, and was what I was trying to build around as I worked on the deck. After watching the card perform in a Mono-Red Control deck featured on NeonMushroom’s channel, I was inspired to build a control deck that uses it as a card advantage engine to go deep into the late-game. Additionally, I’ve always found the concept of winconless control an interesting one, and Premodern generally having slower threats than many other formats as well as having [[Gaea’s Blessing::Gaea’s Blessing]] made a good environment for such a deck.
[[Ivory Tower]] serves as another inevitability engine in many matchups. For example, Sligh struggles to deal with even 10-15 points of lifegain; if I can get back up to 20 life after they have gassed out the game is already basically over. [[Ivory Tower::Tower]] alongside [[Thawing Glaciers::Glaciers]] even lets me continue to hit land drops while still increasing my hand size.
In addition to many traditional control pieces, this deck takes another angle in slowing down the game through fogs. It has 4 [[Tangle::Tangles]], 2 [[Constant Mists]], 1 [[Glacial Chasm]], and 1 [[Kor Haven]]. [[Tangle]] is the primary fog used to bridge into the mid/late game while I develop my resources. [[Constant Mists]] is a later game fog, as once I have 12+ lands in play, I can use it to fog nearly indefinitely, especially using [[Gaea’s Blessing::Gaea’s Blessing]] to shuffle back in sacrificed basics and continuing to tutor them with [[Thawing Glaciers]]. [[Glacial Chasm]] and [[Kor Haven]] are lands that can fog and that I can find as part of the [[Crop Rotation::crop rotation]] package discussed below.
Another piece of the deck I want to mention is the manabase beyond the [[Thawing Glaciers]]. One of my favorite tricks with the deck is the interaction between [[Thawing Glaciers]] and [[Treva’s Ruins::Treva’s Ruins]]. You can play the [[Treva’s Ruins::ruins]] with [[Thawing Glaciers::glaciers]] already out and untapped; hold priority on the [[Treva’s Ruins::ruins]] ETB trigger and activate [[Thawing Glaciers::glaciers]]. After that activation resolves, pick up the [[Thawing Glaciers::glaciers]] with the [[Treva’s Ruins::ruins]] trigger. This lets [[Treva’s Ruins::ruins]] be an untapped 3C land while circumventing the downside. Beyond [[Treva’s Ruins::Treva’s Ruins]], [[Gemstone Mine]] helps fix and support the 8 basics I need to play as glacier targets.
The deck also contains multiple 1-of lands as part of a [[Crop Rotation]] package. [[Kor Haven]] and [[Glacial Chasm]] serve as additional fog effects, as discussed above. [[Glacial Chasm::Chasm]] in particular prevents all damage, not just combat damage, so with [[Crop Rotation]] it can, at instant speed, prevent the damage from a lethal [[Fireblast]] or [[Fling]]. [[Cephalid Coliseum]] can be used to filter my own hand and discard excess lands, or to force my opponent to draw from an empty library following a [[Brain Freeze]]. Lastly, [[Dust Bowl]] is a very clean answer to opposing manlands where [[Wrath of God::Wraths]] miss them.
A notable exclusion from the deck I wanted to mention is [[Moment’s Peace::Moment’s Peace]]. Traditionally an all-star in fog decks, I ended up making the decision to cut it from this deck after having it in some earlier builds. This is partially due to a lack of slots. The deck only has so much room for fogs, and I find [[Tangle]] and [[Constant Mists]] to take those spaces better. Additionally, while the deck does fog often, I did not design it as a “turbo fog” deck. While the difference is largely semantic, I’ve always thought and designed this deck more as a control deck which uses fogs to help slow the game down. For this reason, I only wanted 4-8 fog spells total in the deck, and settled on [[Moment’s Peace::Moment’s Peace]] not making the cut.
Another exclusion is the lack of any man lands. There is a strong argument for playing at least a single copy to find with [[Crop Rotation::crop rotation]], both to block with and punish someone who gets too greedy with their life total. The main reason for the exclusion is mostly a matter of making it fit. The mana base is, frankly, pretty greedy already. Multiple colorless lands in a three-color deck, [[Thawing Glaciers]] being a double tapland, and only having 8 basics to find makes the land slots in the deck incredibly contested. I may still try and fit a [[Mishra’s Factory::Mishra’s Factory]] into the deck, but as of now I am letting [[Wall of Blossoms::Walls]] block and my opponent simply deck as my wincon.
For the sideboard, my decisions largely came down to trying to patch up difficult matchups with specific interaction. The [[Circle of Protection: Red::Circles of Protection: Red]] replace slower cards into red aggressive decks. The [[Seal of Cleansing::Seals of Cleansing]] allow me to interact with problematic hate pieces like [[Tsabo’s Web::Tsabo’s Web]] and [[Phyrexian Furnace]]. It is also, of course, a useful card into [[Phyrexian Dreadnought]] strategies. The spare [[Gaea’s Blessing::Gaea’s Blessing]] is for decks with countermagic and/or graveyard hate that I feel I need the backup blessing for. The second [[Brain Freeze]] lets me more consistently put a reasonable clock on my opponent running out of cards, especially if they cast a lot of spells in one turn as Enchantress does. The [[Kor Haven::Kor Havens]] give extra copies of what can be a very important land to find, as well as just more lands total for Ponza matchups. [[Teferi’s Response::Teferi’s Response]] can also help protect my mana into Ponza and remove problematic [[Rishadan Port::Rishadan Ports]] against Goblins.
Not including [[Meddling Mage::Meddling Mages]] or [[Exalted Angel::Exalted Angels]] was a decision I made in an effort to keep creature interaction as close to useless as possible against my deck and keep my [[Wrath of God::Wraths]] one-sided. I will likely try a build with [[Meddling Mage::mages]] in the sideboard at some point, but at present those slots, just like the fogs and the lands, are very tight.
Looking Forward
After the Brawl, there are some specific adjustments I plan to make to the deck, as well as some cards I may try. I have already mentioned trying to fit in a [[Mishra’s Factory::Mishra’s Factory]] or [[Meddling Mage::Meddling Mages]] somewhere into the 75 if I can find the space. Another card to try might be a singular [[Decree of Justice]], similar to Sam Black’s Gush Tithe.
Another adjustment to the deck I want to try is removing the lone [[Brain Freeze]] in the mainboard. While I do still need to be conscious of the clock, this is less of a concern in Game 1, especially since my opponent will often scoop once I have enough life and cards in hand. Even if they don’t, I can loop [[Cephalid Coliseum]] once the game gets late to speed up their decking.
A card I definitely plan to make space for is 2-3 copies of [[Abeyance]]. This can be good into many decks, but most important into Landstill. If they try to fight it then the storm count can build for [[Brain Freeze]]. And if they don’t, then I can interact and resolve [[Fact or Fiction]] as I please.
Conclusion
A massive shoutout of course to all the Retromancers for putting on this awesome event. Just like the first Buckeye Brawl, it was an absolute blast, and I look forward to more brawls in the future. This whole crew, and the wider premodern community in general, has been so awesome, and I’m very thankful to play with all of you.
A personal thank you to Spire Golem (Josh), Connor, and Nikola for helping me both get into Premodern in general and with the brewing of this deck. You guys have been very supportive and helpful in working out the finer details of this weirdo brew.
Thank you for reading, and here’s to more games going to time in the future!